I was helping out a fellow Windows Phone developer with some app testing today and noticed that his app had a Panorama control with a background color that had a break between the last page and the first page.
Here’s an example using the “Windows Phone Panorama App” project template.


This looks very weird and is distracting from the real content. This problem is very similar to the Changing the background color of your pivot headers post I did. You cannot just change the background within the TitleTemplate. The above images were created by modifying the TitleTemplate of the Panorama.
<controls:Panorama.TitleTemplate>
<DataTemplate>
<Border Background="Blue">
<TextBlock Text="{Binding}" Width="800"
FontSize="80" Margin="0,75,0,0"/>
</Border>
</DataTemplate>
</controls:Panorama.TitleTemplate>
Note: The FontSize, Width and Margin were modified to make the title smaller.
Once again it’s Blend (or now VS2012!) to the rescue. Right click the Panorama and select Edit Template –> Edit a Copy… Much like the Pivot Header, the Panorama has a control for rendering the Title.
<controlsPrimitives:PanningTitleLayer x:Name="TitleLayer" CacheMode="BitmapCache"
ContentTemplate="{TemplateBinding TitleTemplate}"
Content="{TemplateBinding Title}"
FontSize="187"
FontFamily="{StaticResource PhoneFontFamilyLight}"
HorizontalAlignment="Left"
Margin="10,-76,0,9"
Grid.Row="0"/>
You could try setting the Background property of the PanningTitleLayer but will quickly find that it does nothing. You could modify the style of the PanningTitleLayer itself, but I find it is much easier to just add a Border immediately before the PanningTitleLayer.
<Border Background="Blue" Grid.Row="0"/>
<controlsPrimitives:PanningTitleLayer x:Name="TitleLayer" CacheMode="BitmapCache"
ContentTemplate="{TemplateBinding TitleTemplate}"
Content="{TemplateBinding Title}"
FontSize="187"
FontFamily="{StaticResource PhoneFontFamilyLight}"
HorizontalAlignment="Left"
Margin="10,-76,0,9"
Grid.Row="0"/>
Another option is to wrap the PanningTitleLayer with a Border control. With this new Border the background is consistent across all items of the Panorama.


Earlier today Ginny Caughey asked a question about how to maintain an app with support for Windows 8 and 8.1. It’s hard to answer a question that broad so I asked her what she wanted to take advantage of with 8.1. Her main use case is handling of screen [and app] sizes but while she was working, wanted to replace the Callisto SettingsFlyout control with the new native SettingsFlyout control in 8.1. I suggested a few ideas throughout the day from #if separation to MEF.
I started tonight working on a sample on how you could inject a SettingsFlyout using MEF but decided that it was just too complex for this example. I took a step back and thought about how to make this as easy as possible. I recently blogged about how to use the new Geolocator API within a Windows Phone 8 and Phone 7 application and thought that wrapping the Callisto API would be best suited for this situation as well.
The idea behind this blog is that you have one application that supports both Windows 8 and 8.1. You might do this because you want to start upgrading to 8.1 while still supporting Windows 8 (bug fixes, new features etc). to accomplish this you need to projects, one that targets 8 and one targeting 8.1. One project houses the files while the other adds the files as links.
The first step is to create a SettingsFlyout class. You want this class to be in the Windows.UI.Xaml.Controls namespace so that your app can use the same code. The new SettingsFlyout control has nine properties, three methods and one event that are specific to it. You may or may not need all of the properties/methods. Some are not supported in Callisto so while we can stub them, they will have no effect.
using Windows.UI.Xaml.Media;
namespace Windows.UI.Xaml.Controls
{
public class SettingsFlyout
{
private readonly Callisto.Controls.SettingsFlyout _settings = new Callisto.Controls.SettingsFlyout();
public Brush HeaderBackground
{
get { return _settings.HeaderBrush; }
set { _settings.HeaderBrush = (SolidColorBrush)value; }
}
public string Title
{
get { return _settings.HeaderText; }
set { _settings.HeaderText = value; }
}
public object Content
{
get { return _settings.Content; }
set { _settings.Content = value; }
}
public ImageSource IconSource
{
get { return _settings.SmallLogoImageSource; }
set { _settings.SmallLogoImageSource = value; }
}
public void Show()
{
_settings.IsOpen = true;
}
public void Hide()
{
_settings.IsOpen = false;
}
}
}
I only implemented a few of the properties/methods for this sample. If you need more it’s easy to add them. The biggest drawback of this implementation is that it can only be used through code. This does not work if you want to declare your SettingsFlyout in xaml. To create the SettingsFlyout in code subscribe to the Loaded event of the rootFrame within App.xaml.cs. Within the Laded event tell the app that you have settings.
private void RootFrameOnLoaded(object sender, RoutedEventArgs routedEventArgs)
{
SettingsPane.GetForCurrentView().CommandsRequested += OnCommandsRequested;
}
Within the OnCommandsRequested event is where you build up your settings. Now that we have wrapped the Callisto SettingsFlyout, we can use the 8.1 API for creating one!
private void OnCommandsRequested(SettingsPane sender, SettingsPaneCommandsRequestedEventArgs args)
{
var flyout = new Windows.UI.Xaml.Controls.SettingsFlyout
{
HeaderBackground = new SolidColorBrush(Colors.Blue)
};
args.Request.ApplicationCommands.Add(
new SettingsCommand("MySettings", "General Settings",
command =>
{
flyout.Title = "General Settings";
// replace this content with a control that houses yor settings
flyout.Content = new Rectangle
{Fill = new SolidColorBrush(Colors.Red), Width = 100, Height = 100};
flyout.Show();
}));
}
It’s as simple as that.
Today I read that the Windows Phone team had added some new samples. I was excited to take a look at the Free App With Paid Products sample to see if they had done anything different than I had in Disney Expedition. When looking at the sample I was even more excited to see this in MainPage.xaml.cs
// Each in-app product is identified by a string that is unique for the owning app. This value
// is an example identifier for a product that causes the display of ads to be removed from the app.
private const string PRODUCTID = "AdRemovalProductIdentifier";
This little snippet was exactly what I was doing! Using the In App Purchase(IAP) model to remove ads from my app. I continued to look at the sample only to become disappointed that the sample did not really show how to remove ads with an In App Purchase. Okay, I wasn’t that disappointed. Removing an ad on a single page once the purchase is made is easy enough to do if you follow the sample. But there are many unanswered questions
- What if you have multiple pages with ads?
- How do you give the option (button or menu item) to remove ads across many pages?
- How do you remove/hide the ad for a new page if the purchase has been made?
When using IAP to remove ads you should give the user the ability to remove the ads on every page that has ads.
Note: Another option is to have a central location like settings to remove ads. I don’t like this option because often users don’t go to the settings.
The option you give users could be either a button on the ApplicationBar or a MenuItem. While a menu item is not as visible as a button you can be guaranteed that you will have room in the menu to put an option. The menu item should be visible if the IAP has not been made and be hidden if the purchase has been made. Often times you show/hide items with a BooleanToVisibilityValueConverter. Menu items do not have this ability so you’ll want to do this in code. A good place to do this is within the Loaded event of the PhoneApplicationPage. To make this code reusable it will be placed in a class called AdPhoneApplicationPage which inherits from PhoneApplicationPage. This allows you to make any page in your app an AdPhoneApplicationPage rather than a PhoneApplicationPage.
private void OnLoaded(object sender, RoutedEventArgs routedEventArgs)
{
bool adsRemoved = App.AdsRemoved;
// If there is not an ApplicationBar on this page we will need to add one
if ((ApplicationBar == null) && (adsRemoved == false))
{
ApplicationBar = new ApplicationBar
{
// Minimize the bar as it will only have a menu item
Mode = ApplicationBarMode.Minimized
//TODO: Set Background/Foreground color to match your app theme
};
}
// ApplicationBar is null and ads have been removed. Nothing to do!
else if (ApplicationBar == null) return;
ApplicationBarMenuItem removeAdMenuItem = null;
if (ApplicationBar.MenuItems != null)
{
foreach (ApplicationBarMenuItem menuItem in ApplicationBar.MenuItems.OfType<ApplicationBarMenuItem>())
{
if (menuItem != null)
{
if (menuItem.Text == "remove ads")
{
removeAdMenuItem = menuItem;
break;
}
}
}
}
if ((removeAdMenuItem != null) && adsRemoved)
{
// Purchase has been made. Remove the option
removeAdMenuItem.Click -= RemoveAdMenuItemOnClick;
ApplicationBar.MenuItems.Remove(removeAdMenuItem);
// TODO: Remove the ad
}
else if ((removeAdMenuItem == null) && (adsRemoved == false))
{
// Purchase has not been made, give them to option
removeAdMenuItem = new ApplicationBarMenuItem("remove ads");
removeAdMenuItem.Click += RemoveAdMenuItemOnClick;
ApplicationBar.MenuItems.Add(removeAdMenuItem);
}
}
The Loaded event will either add or remove the menu item to the ApplicationBar. If the page does not have an ApplicationBar one will be created to place the menu item in. If the purchase has been made the menu item will be removed. The AdsRemoved property is very similar to the one in the sample except that it caches the value of the purchase.
private static bool? _adsRemoved;
private bool AdsRemoved
{
get
{
if (_adsRemoved == null)
{
_adsRemoved = CurrentApp.LicenseInformation.ProductLicenses["RemoveAdsProductID"].IsActive;
}
return _adsRemoved.Value;
}
}
When the menu item is clicked, we’ll want to perform the IAP and if the user did complete the purchase, remove the menu item.
private async void RemoveAdMenuItemOnClick(object sender, EventArgs eventArgs)
{
try
{
// prompt the user to purchase
await CurrentApp.RequestProductPurchaseAsync("RemoveAdsProductID", false);
if (CurrentApp.LicenseInformation.ProductLicenses["RemoveAdsProductID"].IsActive)
{
// we're rich!
_adsRemoved = true;
// Remove the menu item
var menuItem = (ApplicationBarMenuItem)sender;
ApplicationBar.MenuItems.Remove(menuItem);
// TODO: Remove ad
}
}
catch (Exception)
{
}
}
Notice I had a TODO in there to remove the ad; after all, this is what we are intending to do. One option is to create a custom control that wraps the AdControl and hides it on load if the purchase has been made (I’ll blog about this awesomeness later). Another option is to traverse the child controls of the page to find the AdControl and hide it.
private bool RemoveAdControl(DependencyObject d)
{
var adControl = d as Microsoft.Advertising.Mobile.UI.AdControl;
if (adControl != null)
{
adControl.Visibility = Visibility.Collapsed;
return true;
}
var childCount = VisualTreeHelper.GetChildrenCount(d);
// start at the end of the children as the AdControl is likely to be at the bottom
for (int i = childCount - 1; i >= 0; i--)
{
bool adRemoved = RemoveAdControl(VisualTreeHelper.GetChild(d, i));
if (adRemoved) return true;
}
return false;
}
This simple method uses recursion to find the AdControl and hide it. Replace the TODO statements will one line of code.
You can download the entire AdPhoneApplicationPage here.
In case you do not know how to change the type of PhoneApplicationPage for your pages, here’s a little snippet
<localControls:AdPhoneApplicationPage
x:Class="VisuallyLocated.MainPage"
xmlns="http://schemas.microsoft.com/winfx/2006/xaml/presentation"
xmlns:x="http://schemas.microsoft.com/winfx/2006/xaml"
xmlns:local="clr-namespace:VisuallyLocated.Controls">
<!-- content -->
</localControls:AdPhoneApplicationPage>
Make sure that your code behind then inherits from AdPhoneApplicationPage instead of PhoneApplicationPage.
I’ve been trying to get going with developing Windows 8.1 Store apps on my new Surface Pro but was continually running into the following error.
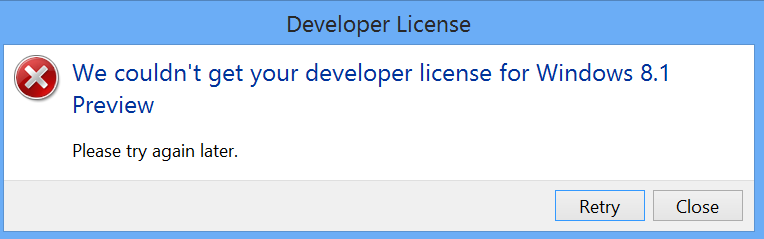
It turns out this error is due to how I configure my PCs. Every time I build a new computer or install a version of Windows I create an “admin” account. This account is only used for admin related stuff. My normal account is not an admin account. I have been doing this configuration since XP due to the lack of security that XP originally offered.
I tried running Visual Studio 2013 as admin, I tried running powershell and the command “Show-WindowsDeveloperLicenseRegistration” but all failed. It wasn’t until a helpful Hermit Dave tried to diagnose this issue with me over twitter that I was able to solve it.
The solution is to log in as your admin account and either run the powershell command or VS2013 to get the developer account prompt, enter you Microsoft account information and then log back into your regular account.
Again, big thanks to Hermit Dave for the help on this issue.