Visually Located

XAML and GIS

Changing the background color of your pivot headers

Let’s say you’re trying to put some style into your app and you really want a nice background color to all of your PivotItem titles. How would you go about doing this? You’re probably thinking “Shawn, that’s easy, just modify the HeaderTemplate on the Pivot.” And I would probably agree with you. Let’s try that out.

<controls:Pivot Title="MY APPLICATION">
    <controls:Pivot.HeaderTemplate>
        <DataTemplate>
            <Grid Background="Red">
                <TextBlock Text="{Binding}"/>
            </Grid>
        </DataTemplate>
    </controls:Pivot.HeaderTemplate>
    <!--Pivot item one-->
    <controls:PivotItem Header="item1"/>
 
    <!--Pivot item two-->
    <controls:PivotItem Header="item2"/>
</controls:Pivot>

Looking at the design view of this gives

image

We did accomplish changing the background color, but this looks horrible. I wanted a nice banner going across the headers. So how can we accomplish this? My two default answers Expression Blend, and msdn. Unfortunately, I have yet to find Windows Phone styles on msdn. So looks like it’s Expression Blend to the rescue! Creating a copy of the default style you’ll see

<controlsPrimitives:PivotHeadersControl x:Name="HeadersListElement" Grid.Row="1"/>

So the headers are in a control made just for the headers of a PivotItem. Interesting, but not surprising. Creating a copy of the style of this control and you’ll see the template defined as:

<Setter Property="Template">
    <Setter.Value>
        <ControlTemplate TargetType="controlsPrimitives:PivotHeadersControl">
            <Grid>
                <Canvas x:Name="Canvas">
                    <ItemsPresenter/>
                </Canvas>
            </Grid>
        </ControlTemplate>
    </Setter.Value>
</Setter>

So we have a Grid and the background for the Grid is not set, not even using TemplateBinding. Luckily we can create a style for the PivotHeadersControl without needing to change any other styles. Add this style to the application resources (App.xaml) and it will apply to all pivots that are in your application.

<Style TargetType="controlsPrimitives:PivotHeadersControl">
    <Setter Property="Template">
        <Setter.Value>
            <ControlTemplate TargetType="controlsPrimitives:PivotHeadersControl">
                <Grid Background="Red">
                    <Canvas x:Name="Canvas">
                        <ItemsPresenter/>
                    </Canvas>
                </Grid>
            </ControlTemplate>
        </Setter.Value>
    </Setter>
</Style>

Now with this style, we get the following:

image

Perfect! Well, maybe not. We do have the nice banner, but it is really close to the title of the Pivot. Going back to the style of the Pivot itself shows that the template for the title is defined as:

<ContentPresenter ContentTemplate="{TemplateBinding TitleTemplate}"
                  Content="{TemplateBinding Title}" 
                  Margin="24,17,0,-7"/>

It has a –7 margin for the bottom. To get a gap between the title and the banner of the headers you can either change the margin of the ContentPresenter (if modifying the template of the Pivot), or you can specify a TitleTemplate.

<controls:Pivot.TitleTemplate>
    <DataTemplate>
        <TextBlock Text="{Binding}" Margin="0,0,0,7"/>
    </DataTemplate>         
</controls:Pivot.TitleTemplate>

And now we have

image

Creating a minimal Web API web project

The ASP.NET web projects have a history of being bloated. Phil Haack created a Really Empty ASP.NET MVC 3 Project Template. The same is true for MVC4 and the new Web API. The “Empty” MVC 4 Application (using razor) has 37 references, 16 JavaScript files, 15 CSS files, 13 images, 3 razor files, and a partridge in a pear tree. This is far from empty. But it does give you everything you could need to build out your own MVC application. The Web API MVC 4 Application has all of that plus two controllers (one API and one view), and one more razor file.

I wanted to create a simple project that would allow me to take advantage of the awesomeness that Web API brings but without all the overhead of MVC or anything else. I asked Glenn Block if he knew about anything out there that talked about the smallest possible Web API project. This started a couple of educational conversions in which Glenn brought in other great Web API minds.  He quickly stated that I could use self host. For one, I was surprised by this answer because I had asked about the smallest package to put on a server. I had thought that self host was for when you are not on a server. He explained that worker role on Azure uses this because IIS is not present. At this point I had two answers from Glenn and quickly realized I know nothing about this stuff!

So, what is the minimal package needed to deploy a Web API “site” and why does it matter? The reason I wanted to know was to remove the need to upload 30+ assemblies to any server that I may deploy to. I did not want all of the JavaScript and CSS files and yadda yadda yadda.

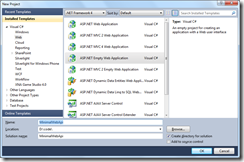
This post will focus on getting the minimal package needed when using a web application, and not self hosted. A later blog will focus on self hosting on the server. First step, download the new ASP.NET MVC 4 beta or Visual Studio 11 beta. Open up Visual Studio and  create a new project. Select ASP.NET Empty Web Application from the Web item on the left.
image

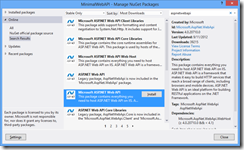
In the Solution Explorer, remove all of the references except for System and System.Web. If you’re a GUI guy (and don’t always know the ID of the NuGet package you want) open the NuGet Package Manager and search for “aspnetwebapi” in the online section. Select the “Microsoft ASP.NET Web API” package.
image

If you’re a command line junkie, open the Package Manager Console and

PM> Install-Package Microsoft.AspNet.WebApi

Add a Global.asax file to the project and you’re done!

This package adds two more assemblies than the Microsoft.AspNet.WebApi.Core package. One of these is the System.Web.Http.WebHost assembly. This assembly provides five helpful classes for doing development. While this is not required, I do recommend it to make your life a little easier.

From here you have a base project to start building your Web API. I like to have my classes neatly filed away, so I still created a Controllers folder to store all of my controllers.

This leaves you with nine references, one Global.asax file and however many ApiControllers you need and that’s it (plus your web.config file of course)! You could remove some of the references from that for your very basic Web API sites, but most likely you’ll need them all.

I am also currently working out the kinks to a VSIX installer, you can find out on GitHub.